You are here: Reporting > BIX > How to use a stand-alone command-line BIX extract process
Using a stand-alone command-line BIX extract process
In certain circumstances, you may want to establish BIX as a stand-alone command-line process, rather than importing it into a Pega 7 Platform system. For example, you may want to avoid disrupting a production instance of Pega 7 Platform, or you may want to use the same instance of BIX to extract data from multiple Pega 7 Platform instances.
To establish a stand-alone command-line BIX extract process:
- Download the BIX distribution archive to your system and expand the archive into a directory. The config directory in this distribution contains the configuration files that you set up to support the extraction process and the lib directory contains the Pega 7 Platform library files that you run against. The distribution also contains a sample Ant build file to run extract process.
- Configure a JVM environment with access to Pega 7 Platform JAR files and the appropriate database driver files. You must have a Java Runtime Environment (JRE) distribution in place in the command-line system that allows you to make Java calls. Use JVM version 1.5, 1.6 or 1.7.
Ensure that your classpath:
- Contains the JAR files in the lib directory of your BIX distribution on the command-line system. This directory contains the Pega 7 Platform libraries.
- Includes the location of the Java Database Connectivity (JDBC) driver JAR files for your database. For more information on the appropriate driver for your database, see Configuring database support on your application server in the Installation Guide. Pegasystems also provides a Platform Support Guide with additional information.
- Configure prconfig.xml, prbootstrap.properties, and prlogging.xml (described in Running a BIX extract from the command-line) to complete the command-line environment.
Example shell script file
The following is a sample ksh script calling the ExtractImpl class with an XML representation of the Extract rule. This sample assumes that the script is being run from the BIX distribution directory and that the CLASSPATH environment variable is set to include the JAR files in the BIX distribution's lib directory.
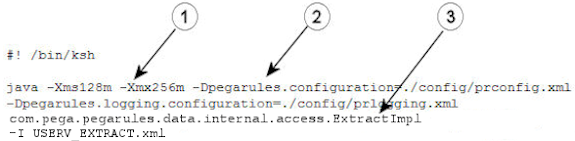
Notes:
- JVM arguments to set the JVM memory parameters.
- JVM arguments to set system properties specifying the location of prconfig.xml and prlogging.xml
- ExtractImpl parameters: -I switch with the name of the XML file containing the XML representation or the Extract rule.
The engine classes are stored in the database and not in the file system. The ExtractImpl class cannot be directly run using the Java interpreter. Instead, run the PegaRULES class and pass the ExtractImpl class as an argument.
Sample Ant build files
The following sample Ant build files execute a call to the ExtractImpl class referencing an Extract rule in the Pega 7 Platform database. The BIX distribution also contains a sample BAT script that calls a similar file.
See the readme.txt file in the BIX distribution directory for details on all the files included there.
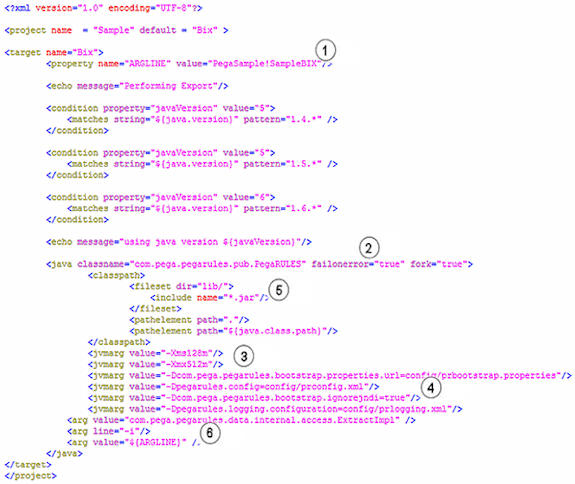
Notes:
- Set the ARGLINE Ant property to the pzInsName of the Extract rule you wish to execute.
- Java call of the ExtractImpl class.
- JVM arguments to set the JVM memory parameters.
- JVM arguments to set system properties specifying the location of prconfig.xml and prlogging.xml.
- Set the classpath to include the JAR files in the BIX distribution's lib directory.
- ExtractImpl parameters: -i switch with the pzInsName of the Extract rule as set in the ARGLINE property.
Creating an XML representation of an Extract rule
When you run BIX from the command-line, BIX can execute an Extract rule that is stored as an external file in XML format. This lets customers dynamically create or modify Extract rules outside of Pega 7 for use during batch extract runs.
To create an XML version of an Extract rule:
- From the Records Explorer, select SysAdmin > Extract and select the Extract rule to run.
- On the rule form, click Actions > View XML. An XML version of the Extract rule displays.
- Save the displayed content as an XML file.
 Related terms
Related information
Open topic with navigation